Performing general maintenance and seal replacement is crucial to the proper functioning of all OILCO v-ring design swivel joints. Read on for best practices related to lubrication and repair.
General safety notes
- Take all due safety precautions when assembling and operating these units
- Handle all components with care
- If there is something unique to your OILCO assembly not covered in this article, please contact us
Regular lubrication is key to maintenance
All OILCO swivel joints are supplied with a grease fitting at each plane of rotation. It is the operator’s responsibility to perform general lubrication on a programmed basis. The programmed basis can range from bi-annually to quarterly or monthly, depending on the service and operating conditions the swivel joint is under. When service is severe, such as high temperatures, heavy loads, or constant rotation – or a combination of these factors – daily lubrication may be required. If in doubt of the best lubrication schedule for your OILCO swivel joint, reach out to us and we’re happy to help.
How to apply lubrication
Inject grease, rotating the unit (as allowed by the installation) as the grease is applied to make sure there is an even application throughout the raceway. Do not over-lubricate. If you over-lubricate you may displace the seals, resulting in leakage of the fluid you plan to transport through the swivel joint.
Lubrication suggested volume table
The table below offers a suggested volume for servicing based on a bi-annual program where operational conditions are fair. Note that the volumes suggested below are for vacant mechanical cavities only. Should lubricant be present and that lubricant is at a good viscosity level, less can be applied during the planned maintenance procedure.
| Swivel Size | Volume |
|---|---|
| 2″ | 2 ounces |
| 3″ | 3 ounces |
| 4″ | 4 ounces |
| 6″ | 7 ounces |
| 8″ | 12 ounces |
*Suggested volume for servicing based on a bi-annual program where operational conditions are fair.
| Swivel Size | Volume |
|---|---|
| 10″ | 20 ounces |
| 12″ | 30 ounces |
| 14″ | 9 ounces per raceway |
| 16″ | 10 ounces per raceway |
| 18″ | 12 ounces per raceway |
| 24″ | 15 ounces per raceway |
*Suggested volume for servicing based on a bi-annual program where operational conditions are fair.
Recommended lubrication type
The generally recommended lubrication for use with Buna-N, Viton® A, neoprene, and Teflon seals is a grease containing a minimum of 5% Molybdenum Disulfide (Molylube SP Lubricant 5).
*Note that this grease should not be used with EPT or butyl seals as it may cause damage.
- The recommended lubrication for oxygen service swivel joints is Halocarbon No. 25-10M.
- The recommended lubrication for ethylene-propylene-terpolymer (EPT), butyl, and silicone seals is Silicone No. 1023 grease, or any other non-petroleum based lubricant.
90 Series Swivel Joint Repair Kit components:
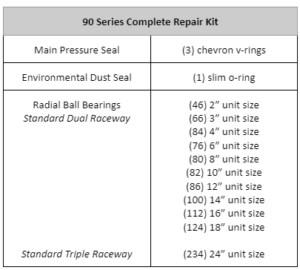
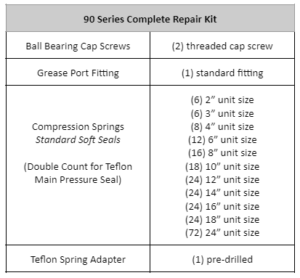
Note: Additional components and considerations may be required for HD (heavy duty) swivel joint models or those with secondary applications, like those sealed for submerged service.
Caution: Any improper handling or disregard for both onsite safety and operational procedures or factory recommendations could cause unnecessary damage to the unit and severe personal injury.
Warning: Never exceed the rated working pressure of the unit. Never modify or alter a unit beyond that to which it has been designed. Should any unit appear damaged, remove it from service immediately and contact the factory.
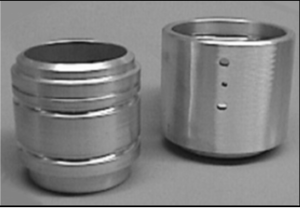
- STEP 1: Remove the ball retainer screws. Add a sufficient amount of solvent into each raceway to flush out the lubricant. Rotate the sleeve, catching the balls as they fall out. When all the balls have been removed, the body and sleeve can be separated. Discard the old seals, then thoroughly clean both the body and sleeve.
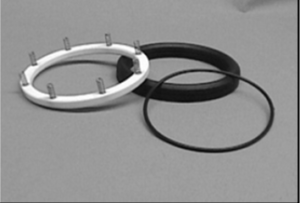
- STEP 2: Assemble the spring adapter, collect three v-rings, and the appropriate dust seal. The main packing seal arrangement is
- Compression springs down on the shelf of the swivel joint body and
- Chevron seals in a stack with the point facing upward
- Note: Teflon compounds require additional springs for proper installation. With included Teflon seals, the Teflon v-rings rest on the spring adapter and the soft seal is placed on top.
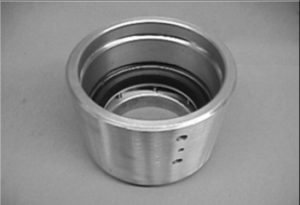
- STEP 3: Lubricate the packing seal area of the body and then insert the spring adapter and three v-ring seals.
Note: Lubricant information and recommendations are included in this document.
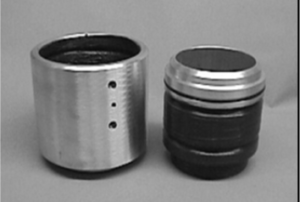
- STEP 4: Place the dust seal on the sleeve. Grease the remaining body and sleeve with Molylube® grease equivalent.
Note: Lubricant information and recommendations are included in this document.
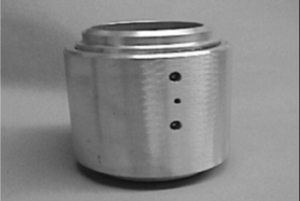
- STEP 5: When the sleeve is fully inserted, feed the ball bearings into the raceways. Insert a flathead screwdriver (or bearing tool) and rotate the joint to make space for the balls. Be extremely careful not to damage the threads or scratch the raceway surface. Then, reverse the rotation to insert the remaining balls.
Note: There will be a slight gap between the last and first bearing. Do not attempt to over-fill the unit.
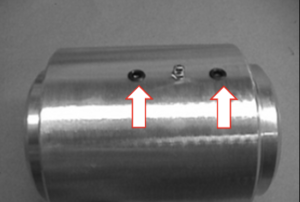
- STEP 6: Reinstall the ball retainer screw and tighten. If this prevents smooth rotation, back off 1/8 of a turn. A thread locking sealant is recommended to prevent screws from backing off. After pressure testing, the unit is ready for installation.
OILCO: Reliability at every turn
The front-runner of the OILCO product catalog, the 90 Series is built to keep up with your workflow. Programmed maintenance helps reduce long-term costs and protects your investment. Proudly designed and manufactured in the U.S. since 1935, OILCO Liquid Handling Systems’ reliable products keep industries moving. From our unparalleled swivel joint line to our innovative loading arm assemblies, OILCO products are engineered to do more.
